


DigiNode Seeder: Set up a DigiByte DNS seeder with a single command
DigiNode Seeder is a new free tool that sets up a DigiByte DNS seeder on your own server with one command. It can run a mainnet seeder, a testnet seeder, or both on the same server with a single IP address. Seeders help new DigiByte nodes find the network, and DigiByte needs more of them.
New to DigiNode Tools? See what it does →
What is a DNS seeder?
When a DigiByte node starts for the first time, it doesn’t know any other nodes. To find some, it asks the DNS seeders written into DigiByte Core: small servers, run by volunteers, that constantly check the network and hand out the addresses of nodes that are up and on the right chain. The new node connects to those, learns about more from them, and starts downloading the blockchain.
Seeders are a small part of the network, but an important one. Every seeder run by a different person, in a different place, makes it harder for new nodes to be cut off from the network or misled.
Why DigiByte needs more
DigiByte Core v9 lists five mainnet seeders and three testnet seeders. That’s not many, and they don’t all work equally well. When I checked last week, all but one of the mainnet seeders only answered the plain form of the question, not the filtered form DigiByte Core asks first, so nodes had to fall back on a slower route. And on DigiByte Core v9’s new testnet, the seeders were handing out a single node between them, even though there are at least ten.
Part of the reason is that setting up a seeder has been fiddly: building it by hand, running it in a terminal session, a firewall rule to redirect port 53, a cron job to start it after a restart. And until now, the seeder itself didn’t support DigiByte Core v9’s testnet at all.
What DigiNode Seeder does
You log in to your server, run one command, and answer a few questions:
curl -sSL https://seedsetup.diginode.tools | sudo bash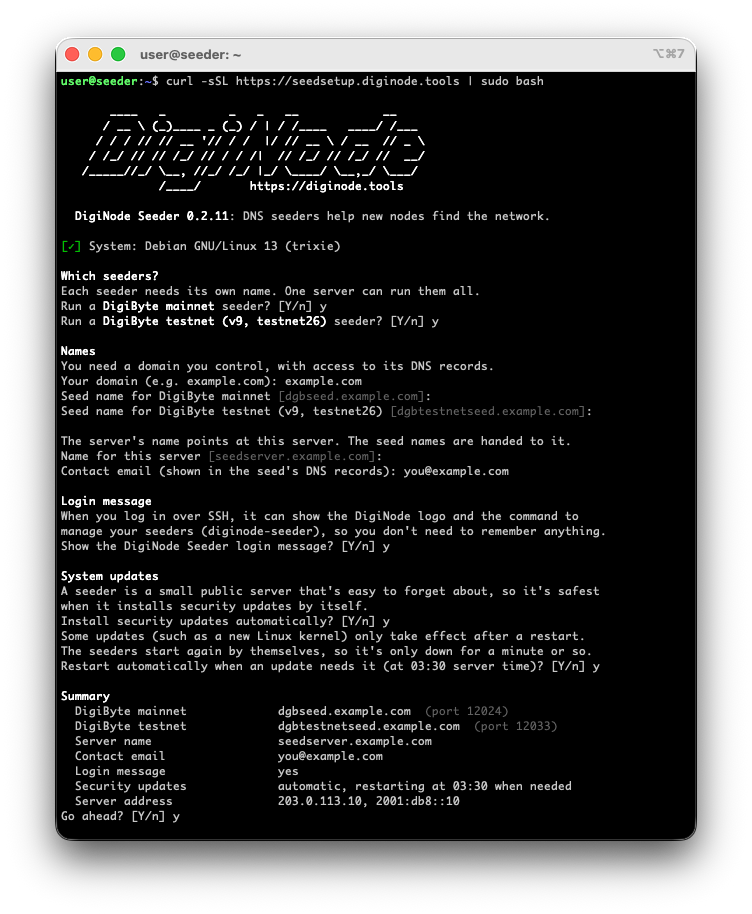
Then it does the rest:
- Runs a mainnet seeder, a testnet seeder (DigiByte Core v9) or both on the same server, with one IP address. Running both used to need two servers.
- Builds the seeder from source, and runs each one as a locked-down service that starts when the server does and restarts if it ever stops.
- Answers only for your seed names, so your server can’t be misused as an open DNS server.
- Shows you the exact DNS records to add, then checks them for you and says in plain words what’s wrong, if anything.
- Installs security updates by itself, restarting only when an update needs it.
Once it’s set up, one command on the server, diginode-seeder, shows how your seeders are doing, updates them (--update), and tells you when it’s time to ask for your seed to be added to DigiByte Core, with the exact line to add. Each time you log in, a short message reminds you of it and warns you if a seeder has stopped.
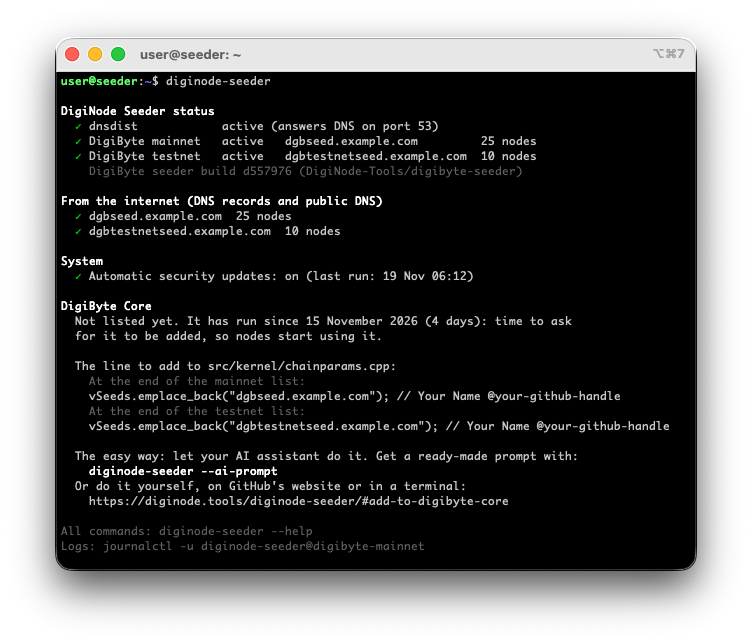
DigiNode Seeder builds a new version of DigiByte’s seeder with support for DigiByte Core v9’s testnet. Both my own seeders, seed.diginode.tools and testnetseed.diginode.tools, now run on one small server set up with it. The testnet one currently hands out ten v9 testnet nodes.
What you need
- A small server (VPS) with its own IP address, running Debian or Ubuntu. A seeder needs very little, so the cheapest plan most providers offer is enough: mine costs about £1.40 a month.
- A domain name where you can add DNS records.
- A few minutes to set it up, and the time to look after it.
That last part matters. Once your seed is in DigiByte Core, nodes rely on it for years, so it needs to keep running 24/7. The guide explains what that involves before you start, including how to get an alert if it ever stops.
Getting into DigiByte Core
Once your seeder has run reliably for a few days, the last step is to ask for it to be added to DigiByte Core, so nodes start using it. For many people this is the hardest part, so DigiNode Seeder helps: diginode-seeder --ai-prompt writes a ready-made prompt for your AI assistant (such as Claude or ChatGPT), which can prepare the pull request for you and show it to you before anything is sent. All you need is a free GitHub account. The guide also explains how to do it yourself, on GitHub’s website or from the terminal.
Get started
Everything you need is on the DigiNode Seeder page: what you need, setting it up, the DNS records, getting your seeder into DigiByte Core, and looking after it. If you’d rather set one up manually, the guide covers that too.
If you get stuck or have questions, ask in the DigiNode Tools Telegram group.

Comments
Subscribe to read new blog posts in apps that support Standard.site, such as Standard Reader or Leaflet.
To see everything @diginode.tools posts, follow on Bluesky.
To comment here as {{handle}}, this site needs one more permission from your Atmosphere account.
Your account's own site (Bluesky's, for most people) will ask you to approve it, and may ask you to sign in there first. Then you'll come straight back here.
Powered by Atmosphere Comments for Astro