


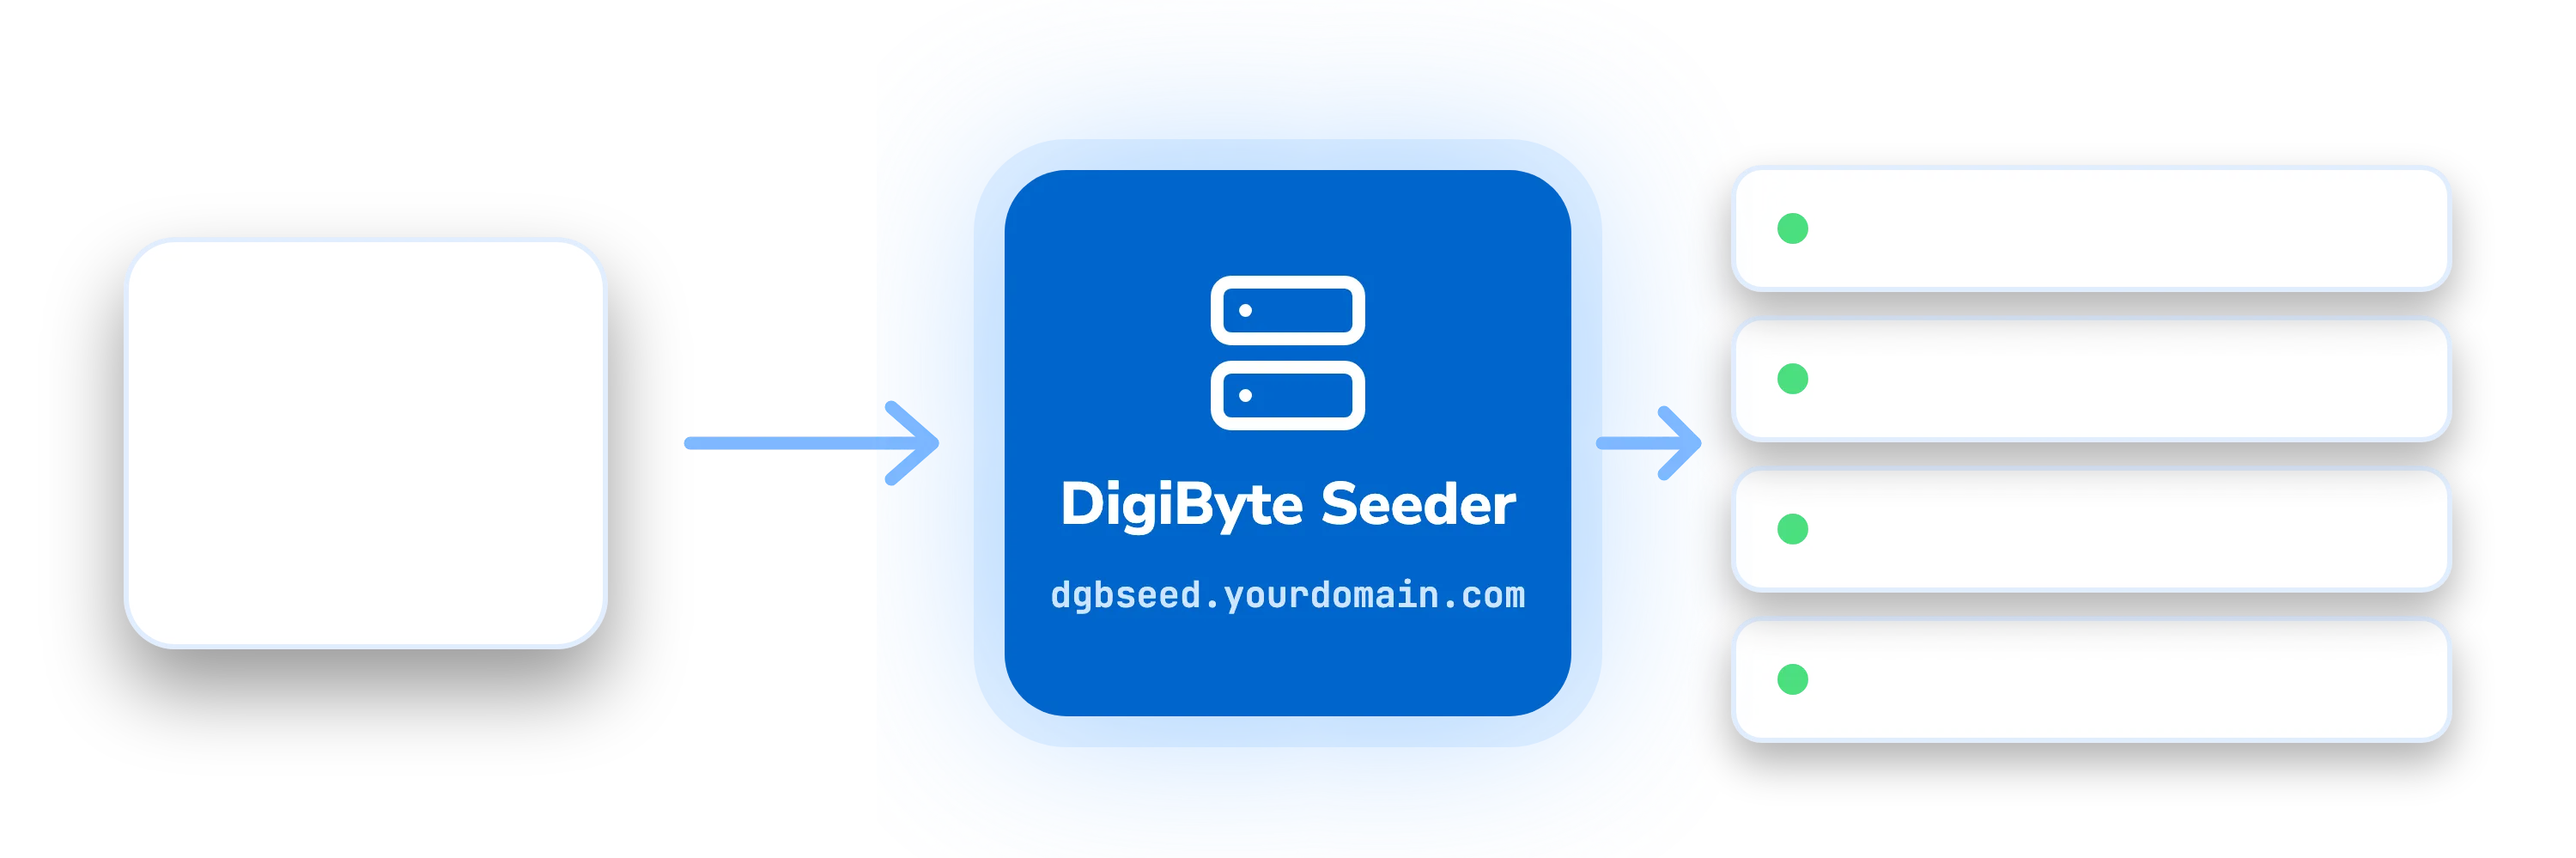
What is a DigiByte seeder?
When a DigiByte node starts for the first time, it knows no other nodes. It finds them by asking the DNS seeders written into DigiByte Core: small servers run by volunteers that constantly check the network and hand out the addresses of nodes that are up and on the right chain.
Every extra seeder, run by a different person in a different place, makes the network harder to cut off or mislead. Running one is a simple, low-cost way to help DigiByte.
How it works
- 1A new DigiByte node joining the network queries a seed server from the list built into DigiByte Core, such as seed.diginode.tools.
- 2The seeder answers like a DNS server, with the addresses of about 25 reliable nodes.
- 3The new node connects to those nodes and learns about more nodes from them.
- 4It starts downloading the blockchain from the network of nodes it has connected to.
Behind the scenes, the seeder:
- Crawls the network all the time, revisiting known nodes to check they are still there.
- Only hands out nodes that are reachable, on the right network, up to date and running a recent DigiByte Core.
- Bans nodes that keep failing or misbehave.
- Answers filtered questions too (such as
x9.dgbseed.yourdomain.com, nodes with particular services), which DigiByte Core asks first. - Needs very little: a few tens of megabytes of memory and hardly any CPU.
DigiNode Seeder: a seeder with one command
DigiNode Seeder sets up a DigiByte seeder on your own server for you, in a few minutes. Log in to the server, run one command, answer a few questions, and it does the rest:
- Runs a mainnet seeder, a testnet seeder (DigiByte Core v9) or both on the same server, with a single IP address.
- Builds the seeder from source, and runs each one as a locked-down service that starts at boot and restarts if it stops.
- Answers only for your seed names, so your server can't be misused as an open DNS server.
- Shows you the exact DNS records to add, then checks them for you and says what's wrong, if anything.
- Installs security updates by itself, restarting only when an update needs it.
- Gives you one command,
diginode-seeder, to check on it, update it and get it into DigiByte Core, and reminds you of it each time you log in.
It's free and part of DigiNode Tools. The script is a single file on GitHub (DigiNode-Tools/diginode-seeder), so you can read it before you run it.
What you need
A server
A small VPS (virtual private server) with its own public IP address and a reliable connection. A seeder needs very little, so the cheapest plan most providers offer is enough: 0.5 GB of memory is fine. Fasthosts has one for about £1.40 a month; DigitalOcean, Linode and Hetzner are other options.
It needs Debian 12 or 13, or Ubuntu 22.04 or 24.04, with nothing else using port 53. Your provider's firewall must let UDP port 53 in.
A domain name you control
A domain where you can add DNS records, including NS records for a subdomain. You will use names like dgbseed.yourdomain.com.
Some DNS providers don't let you add NS records for a subdomain. Check first. Cloudflare and most registrars do.
Set it up
Three steps: run the setup, add the DNS records, then check on it now and then.
Run the setup on your server
Log in to your server with SSH (for example ssh [email protected], using your server's address) and run:
curl -sSL https://seedsetup.diginode.tools | sudo bashIt checks the server, then asks a few questions. Press Enter to accept a suggestion in [brackets]:
dgbseed.yourdomain.com and dgbtestnetseed.yourdomain.com. Starting them with the chain keeps them apart if seeders for other blockchains share the server later.seedserver.yourdomain.com. The seed names are handed to it.diginode-seeder command each time you log in, so there's nothing to remember.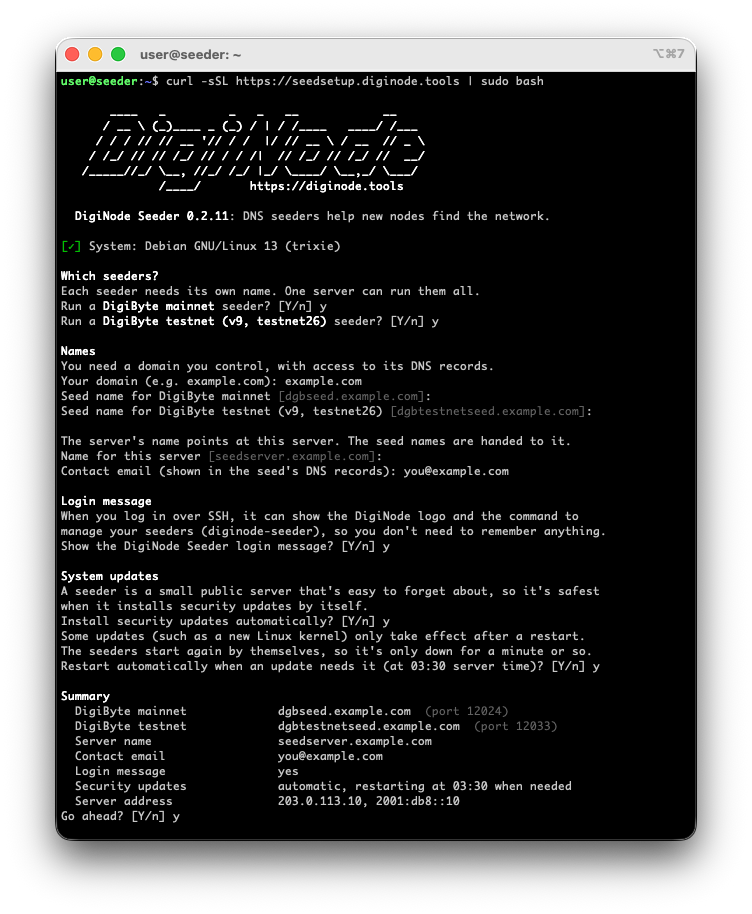
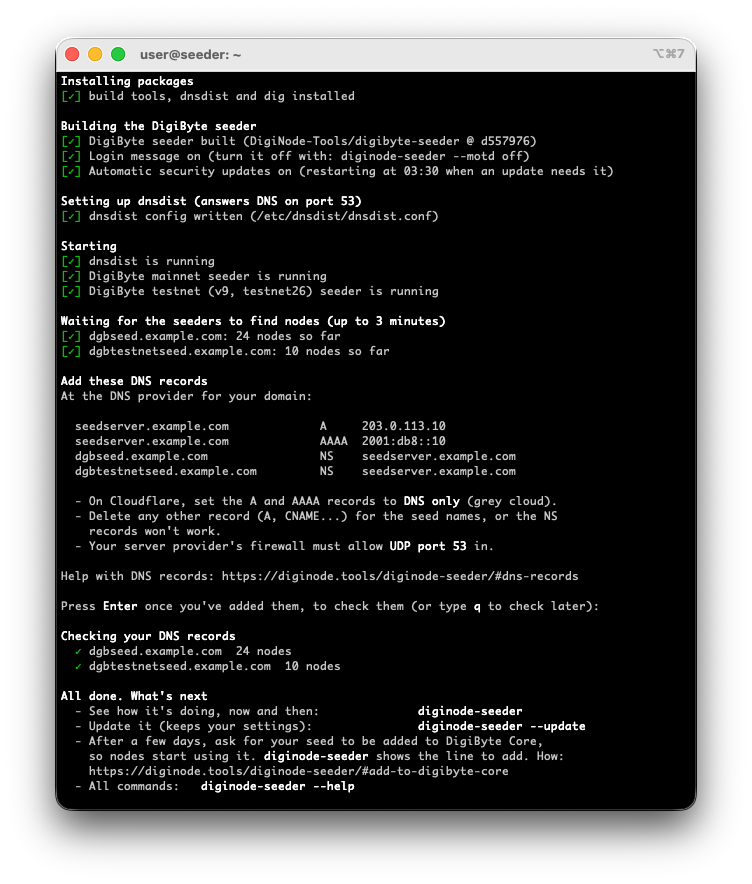
It then installs what it needs, builds the seeder and starts everything, showing its progress as it goes. A few minutes later, when the seeders are finding nodes, it shows the DNS records to add.
Add the DNS records
At the DNS provider for your domain, add the records the setup shows you. With the example names they look like this:
| Name | Type | Value |
|---|---|---|
seedserver.yourdomain.com | A | Your server's IPv4 address, e.g. 203.0.113.10 |
seedserver.yourdomain.com | AAAA | Its IPv6 address, if it has one, e.g. 2001:db8::10 |
dgbseed.yourdomain.com | NS | seedserver.yourdomain.com |
dgbtestnetseed.yourdomain.com | NS | seedserver.yourdomain.com |
The A (and AAAA) record says where your server is. The NS records hand the seed names over to your server, so it answers for them.
On Cloudflare, set the seedserver.yourdomain.com records to DNS only (grey cloud), not proxied. And make sure the seed names have no other records (A, CNAME...), or the NS records won't work.
The setup waits while you add them. Press Enter and it checks them, and tells you in plain words what's wrong, if anything. DNS changes can take a few minutes to spread: you can also stop and check later with diginode-seeder --dns.
Look after it
The setup installs the diginode-seeder command on your server. Run it now and then to see how your seeders are doing:
diginode-seeder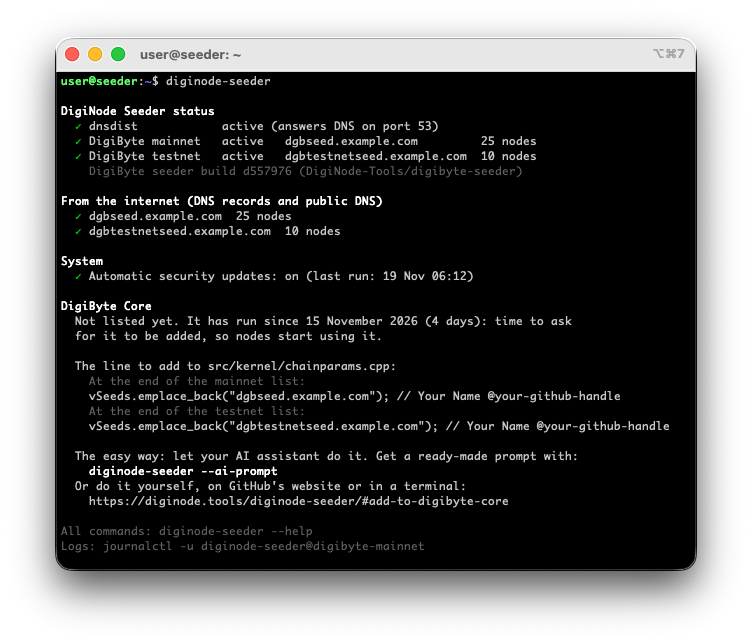
diginode-seeder--dns--ai-prompt--update--reconfigure--motd on|off--auto-updates on|off--auto-restart for the restarts).--uninstall--helpUpdating, changing and removing need administrator rights: if you aren't logged in as root, it asks for your password. Check on it at least once a month. The login message tells you if a seeder has stopped, or if the server is waiting to restart after an update.
Running one responsibly
Seeders are run by volunteers, and nodes depend on them, so please only list yours in DigiByte Core if you can look after it. The DigiByte Critical Infrastructure Team (DGBCIT) coordinates the people who run DigiByte's seeders and other key services. Say hello in the #DGBCIT channel on the DigiByte Discord server. If you add a seeder, they ask that you:
Joining the DGBCIT is optional but encouraged. You can run a seeder anonymously, but it is less likely to be added to DigiByte Core if no one knows who you are.
The last step: get your seeder into DigiByte Core
Nodes only ask the seeders written into DigiByte Core, so your seeder only starts helping once it is listed there. You ask for that with a pull request (PR) that adds one line to src/kernel/chainparams.cpp. Once it is merged, it goes out with the next release, and nodes start using your seeder as they update.
Before you ask
- Let your seeder run for a few days, and check it's still answering.
- Run
diginode-seederon your server. Once your seeds work from the internet, it shows whether they are in DigiByte Core yet and, if not, the exact line to add and when it's time to ask. - You need a GitHub account (free, at github.com/signup). The line you add includes your name and GitHub handle, so the developers can reach you if your seeder ever has a problem.
The easy way: let your AI assistant do it
If you're not familiar with Git and GitHub, this is the simplest way. Use the desktop app of the AI assistant you prefer (such as Claude or ChatGPT) on your own computer: it can make the pull request in your web browser or on the command line. It checks your seeder first, prepares everything, and shows it to you before anything is published.
On your server, run:
diginode-seeder --ai-promptIt asks your name and GitHub handle, then prints a prompt with all your details filled in. Copy it and paste it into your AI assistant. It looks like this:
Show the prompt
I run a DigiByte DNS seeder (set up with DigiNode Seeder) and want it added to
DigiByte Core. Please prepare a pull request for me. I'm not familiar with Git, so
explain each step briefly as you go.

My details:
- DigiByte mainnet seed: dgbseed.yourdomain.com  (goes in the mainnet list; it currently returns about 25 nodes)
- DigiByte testnet (v9, testnet26) seed: dgbtestnetseed.yourdomain.com  (goes in the testnet list; it currently returns about 10 nodes)
- My name as it should appear: Your Name
- My GitHub handle: your-github-handle
- Running since: 1 March 2027

You can do this in my web browser on GitHub's website, or on the command line with
git and the GitHub CLI (gh), whichever works best for you.

Steps:
1. Check each seed name answers from the internet: each of <name> and x9.<name>
   should return several IP addresses (for example with `dig +short <name>`,
   nslookup, or an online DNS lookup). Stop and tell me if any returns nothing.
2. Check I'm signed in to GitHub. If I don't have a GitHub account, stop and tell
   me to create one at https://github.com/signup first.
3. If I don't have a fork of DigiByte-Core/digibyte yet, create one in my GitHub
   account (a public copy, which is normal and fine to do before my OK). Work on
   a new branch from the latest `develop` branch. (On GitHub's website, editing
   the file on the develop branch and choosing "Create a new branch for this
   commit and start a pull request" does this.)
4. In src/kernel/chainparams.cpp, add these lines, each at the end of its list
   (mainnet: under "// DigiByte MAINNET DNS Seed Server:", testnet: under
   "// DigiByte TESTNET DNS Seed Servers:"), copying the format of the lines
   above exactly:
   At the end of the mainnet list:
     vSeeds.emplace_back("dgbseed.yourdomain.com"); // Your Name @your-github-handle
   At the end of the testnet list:
     vSeeds.emplace_back("dgbtestnetseed.yourdomain.com"); // Your Name @your-github-handle
   Change nothing else in the file.
5. Before anything is published, show me the change, the commit message, the
   pull request title and its description, and wait for my OK.
   - Commit message: like "net: Add <seed name> DNS seed", with no @ mentions
     (DigiByte's contribution rules).
   - Title: starts with "net:".
   - Description: which seed(s) it adds, who runs them, since when, and that
     they answer plain and x9. queries (with the number of addresses each returned).
6. Only after I say yes: commit, and open the pull request against
   DigiByte-Core/digibyte, base branch `develop`. Give me the link, and tell
   me how to follow the reviewers' comments.
Or yourself, on GitHub's website
Nothing to install:
- Sign in to GitHub and open
src/kernel/chainparams.cppon thedevelopbranch. - Click the pencil (Edit this file). GitHub makes your own copy (a fork) of DigiByte Core.
- Find the right list and add your line at the end of it: for mainnet, the list under
// DigiByte MAINNET DNS Seed Server:; for testnet, the list under// DigiByte TESTNET DNS Seed Servers:.
vSeeds.emplace_back("dgbseed.yourdomain.com"); // Your Name @your-github-handleCopy the lines above it exactly, with the same spacing and a semicolon at the end, and change nothing else.
- Click Commit changes… and write a message like
net: Add dgbseed.yourdomain.com DNS seed. DigiByte's rules say commit messages must not contain @ mentions, so leave your handle out of it: it only goes in the line of code. Choose Create a new branch for this commit and start a pull request, then Propose changes. - Check the pull request goes into DigiByte-Core/digibyte, branch develop. Give it a title starting with
net:, and a short description, for example:
Adds dgbseed.yourdomain.com as a mainnet DNS seed, run by Your Name. It has been running since 1 March on its own server (set up with DigiNode Seeder) and returns about 25 nodes, for both plain and x9. queries. I'll keep it running, and I'm happy to be contacted if it ever has a problem.
- Click Create pull request and reply to any comments from the reviewers.
Running both seeders? Add both lines in the same pull request.
Or from the terminal
For anyone comfortable with git. You need the GitHub CLI (gh), signed in with gh auth login.
Fork DigiByte Core and get the develop branch:
gh repo fork DigiByte-Core/digibyte --clone=falsegit clone --branch develop --single-branch --depth 50 https://github.com/<your-github-handle>/digibyte.gitcd digibytegit remote add upstream https://github.com/DigiByte-Core/digibyte.gitgit fetch upstream developgit switch -c add-seed upstream/developAdd your line at the end of the mainnet (or testnet) list, matching the lines above it, then check that only your line changed:
grep -n 'vSeeds.emplace_back' src/kernel/chainparams.cppnano src/kernel/chainparams.cppgit diffCommit (no @ mentions in the message), push to your fork and open the pull request:
git commit -am "net: Add dgbseed.yourdomain.com DNS seed"git push -u origin add-seedgh pr create --repo DigiByte-Core/digibyte --base develop --title "net: Add dgbseed.yourdomain.com DNS seed" --body "Adds dgbseed.yourdomain.com as a mainnet DNS seed, run by Your Name. Running since 1 March (set up with DigiNode Seeder); returns about 25 nodes for plain and x9. queries."After it's merged
Keep your seeder running: it updates itself with security updates, and diginode-seeder --update updates DigiNode Seeder and the seeders. If you ever need to stop it, tell the DGBCIT and open another pull request to remove your line, so nodes don't keep asking a seed that has gone.
Prefer to do it yourself?
DigiNode Seeder is the quickest way, and it does things a guide can't, like checking your DNS records and keeping the server updated. If you'd rather not run a script, you can read it first: it's one file, and its README sums up what it sets up. Or set a seeder up by hand. In short:
On Debian or Ubuntu, build DigiNode Tools' copy of DigiByte's seeder, which adds support for DigiByte Core v9's testnet:
sudo apt-get install -y build-essential libssl-dev libboost-dev git dnsutilsgit clone https://github.com/DigiNode-Tools/digibyte-seedercd digibyte-seeder && makeIt answers DNS on port 53, so run it as root, or with CAP_NET_BIND_SERVICE (see the service file below). The email has its @ replaced by a dot:
sudo ./dnsseed -h dgbseed.yourdomain.com -n seedserver.yourdomain.com -m you.yourdomain.com -a 203.0.113.10 -p 53For testnet, add --testnet --minheight 600000 (the minimum height leaves out nodes that are stuck or on their own fork). All its options: ./dnsseed --help.
dig +short dgbseed.yourdomain.com.unattended-upgrades).A systemd service file for the seeder
[Unit]
Description=DigiByte DNS seeder (mainnet)
After=network-online.target
Wants=network-online.target

[Service]
User=dgbseeder
ExecStart=/usr/local/bin/digibyte-seeder -h dgbseed.yourdomain.com -n seedserver.yourdomain.com -m you.yourdomain.com -a 203.0.113.10 -p 53
StateDirectory=dgbseeder-mainnet
WorkingDirectory=/var/lib/dgbseeder-mainnet
AmbientCapabilities=CAP_NET_BIND_SERVICE
CapabilityBoundingSet=CAP_NET_BIND_SERVICE
NoNewPrivileges=yes
ProtectSystem=strict
ProtectHome=yes
PrivateTmp=yes
Restart=always
RestartSec=10

[Install]
WantedBy=multi-user.target
Install the program as /usr/local/bin/digibyte-seeder, create the user (sudo useradd --system --no-create-home --shell /usr/sbin/nologin dgbseeder), save this as /etc/systemd/system/digibyte-seeder-mainnet.service, then sudo systemctl enable --now digibyte-seeder-mainnet.
Both seeders on one IP address (dnsdist)
Only one program can use port 53. Put dnsdist there (sudo apt-get install -y dnsdist), run the seeders with -a 127.0.0.1 -p 5301 (mainnet) and -a 127.0.0.1 -p 5302 (testnet), point both seed names' NS records at the same server name, and use this as /etc/dnsdist/dnsdist.conf:
setLocal("203.0.113.10:53")
setACL({"0.0.0.0/0", "::/0"})
setSecurityPollSuffix("")
addAction(MaxQPSIPRule(50), DropAction())
addAction(TCPRule(true), RCodeAction(DNSRCode.REFUSED))

newServer({address="127.0.0.1:5301", pool="mainnet"})
local mainnet = newSuffixMatchNode()
mainnet:add("dgbseed.yourdomain.com.")
addAction(SuffixMatchNodeRule(mainnet), PoolAction("mainnet"))

newServer({address="127.0.0.1:5302", pool="testnet"})
local testnet = newSuffixMatchNode()
testnet:add("dgbtestnetseed.yourdomain.com.")
addAction(SuffixMatchNodeRule(testnet), PoolAction("testnet"))

addAction(AllRule(), RCodeAction(DNSRCode.REFUSED))
With automatic updates, keep changed config files (dpkg's --force-confold), or dnsdist won't be updated: it's what DigiNode Seeder sets up.