What is a DigiByte Seeder?
A DigiByte Seeder is a server running a lightweight crawler for the DigiByte network, which exposes a list of reliable nodes via a built-in DNS server. These are run by trusted volunteers in the community to help support the DigiByte network.
To ensure a good amount of redundancy, the DigiByte network ideally needs at least 10 Mainnet seeders and 4 Testnet seeders. By running one, you are helping to make the DigiByte network more robust and reliable.
How it works
The DigiByte Seeder software:
- Regularly revisits known nodes to check their availability
- Bans nodes after enough failures, or bad behaviour
- Accepts nodes down to v0.5.0 to request new IP addresses from, but only reports good post-v0.6.9 nodes.
- Keeps statistics over (exponential) windows of 2 hours, 8 hours, 1 day and 1 week, to base decisions on.
- Very low memory (a few tens of megabytes) and CPU requirements.
- Crawlers run in parallel (by default 96 threads simultaneously).
A list of URLs pointing at the current DigiByte Seeders for mainnet and testnet is hardcoded into the DigiByte Core software. When a new node joins the DigiByte network, it connects to one of the available seeders. The new node tells the seeder its own IP address, and the seeder provides the node with a list of reliable full nodes it can connect to. The new node can then connect to these to begin syncing with the network. In short, the seeders are there to help new nodes find reliable existing nodes to connect to.
What You Need
- A Server (e.g. VPS)
Your server needs a fast, reliable connection and a Static IP address. A VPS is recommended. There are many providers who offer this. Digital Ocean is a good choice. You can also try Linode. Fasthosts has VPS for £1 / month. You need very few resources to run a DigiByte Seeder - it is very lightweight, only needing a few Mb of RAM to run. In most cases, the cheapest tier that the provider offers will be more than adequate. If you shop around you should be able to find a suitable VPS for 1-2 USD per month. Ideally, it should be running Ubuntu. Debian should also work. - A domain name you control
A domain name where you have the ability to manage the DNS records. Important: You need to have the ability to create a new NS record. Some providers do not allow this, so check first.
Before you Begin
Running a DigiByte Seeder is a responsibility. Everyone running one is doing so on a voluntary basis. In order to ensure that the DigiByte Seeders work reliably and are best able to support the network, we strongly encourage each person running one to join the DigiByte Critical Infrastructure Team.
DGBCIT was created with the goal of ensuring that the DigiByte blockchain, along with its critical services, are kept running at all times. This is achieved though a community effort of coordinated decentralization and redundancy. Trusted members of the community are asked to commit to the responsibility of running and maintaining various components of the blockchain for a fixed period of time to ensure that there is always a minimum viable network in operation, and that there is a clear line of responsibility in maintaining that network.
If you are planning to run a DigiByte Seeder, we kindly ask that you consider joining the DGBCIT and committing to the following:
- You will run a maximum of one mainnet seeder, and one testnet seeder (if needed). This helps to distribute and decentralize and mitigate single points of failure and also gives others the chance to participate.
- You will keep your seeder online until the end of the next calendar year. (1-2 years minimum.)
- You will provide your real name, and at least two pieces of contact information (Email, Telegram, Bluesky, Discord etc.). This is to provide accountability, and so that you can be easily contacted in the event of a problem. (If you are providing your email address, using a service like AnonAddy is recommended.)
- You will check on your DNS seeder regularly (at least once a month) to ensure it stays running, and in the event of a problem, you will do your best to fix it in a timely manner. (Given how lightweight the software is, crashes are rare, but If you need help, feel free to ask in the DGBCIT Telegram group.) Please note that, if your seeder experiences long periods of downtime, and you are unresponsive to requests to fix it, it may be removed.
- If at any time you are no longer able to keep running your DigiByte Seeder, you will contact the rest of the team via the #DGBCIT channel on the DigiByte Discord server, to allow time for a replacement maintainer to be found to take your place.
By committing to these guidelines, and being part of the DGBCIT, you are helping to ensure that the DigiByte community always has a robust and reliable network of DNS seeders to help new nodes connect to the network.
It is important to stress that participation in the DGBCIT is optional, but encouraged. Anyone is free to set up a DigiByte Seeder anonymously, but it may be less likely to be approved into the codebase if no one knows who you are.
Running a DigiByte Full Node with your Seeder
For your DigiByte Seeder to work, running a full node on the same VPS is not required - it should be able to connect to the other seeders automatically to start crawling the network.
That said, if your VPS has the resources, you can help the network even further by also running a DigiByte full node on the same machine as your DNS seeder. Your seeder will then be able to connect directly to your own local node, and vice versa.
At time of writing, running a DigiByte full node requires at least 8Gb RAM and at least 50GB disk space + more for future growth. Be sure to open port 12024 (mainnet) or 12026 (testnet). You can also increase the connection count by editing digibyte.conf to allow your node to connect to as many peers as possible.
Setup your DigiByte Seeder
Step 1. Setup the DNS records for your domain name
Look up the IP address of your server. If you are using a VPS, you should be able to find this in the admin area of your provider. You will need it for this step.
To complete this step, you will need to log in to your account with your domain registrar, and go to the DNS settings page for the domain you will be using.
You need to create two DNS records, an A record and an NS record. See the example below:

If your server supports IPv6, you should add a AAAA record as well:

Setup the NS record:
For the host enter the URL you want to use to access your seeder. For a mainnet seeder, you can use something like seed.yourdomain.com. For a testnet seeder use something like testnetseed.yourdomain.com. (For a testnet seeder, it is sensible to include the worst 'testnet' in the URL to make it easy to distinguish from a mainnet seeder.) For the answer, enter a URL to identify your VPS server. This can be whatever you like. I have used vps.digibyte.help in the above example.
IMPORTANT: Please note that some providers do not allow you to add a custom NS record. In this instance, you may need to move your domain to one that does, or set up a new domain with a different provider.
Setup the A record:
For host, enter the URL that you used to identify your VPS server in the previous step. For the answer, enter the static IP address of your VPS. You can find this in the admin area of your VPS provider.
IMPORTANT: Once you add these records, you will need to wait a while for the changes propagate around the internet.
Test the NS record from the terminal:
dig -t NS seed.yourdomain.comIt should return the sub-domain you chose to identify your server:
seed.yourdomain.com. 21600 IN NS servername.yourdomain.com.
Test the A record from the Terminal:
dig -t A servername.yourdomain.comIt should return the IP address of your server:
servername.yourdomain.com. 161 IN A 123.123.123.123
Step 2. Connect to your server via the console or terminal
If you are using a VPS, most providers give you a way to access the console via the admin area.
Alternatively, you can connect from your computer using SSH. On macOS you can use the built-in terminal or iTerm. On Windows you can use Putty or MobXterm. To SSH into your VPS, enter ssh username@ipaddress. For example:
ssh [email protected]If you have not using your SSH keys, you will be prompted for the password.
Step 3. Download the DigiByte Seeder software on your server
These instructions are for Ubuntu or Debian. You may need to adapt them for other distros.
- Ubuntu
- Debian
Perform a system update:
sudo apt-get updateInstall required software packages needed to compile and run the DigiByte Seeder:
sudo apt-get install gcc g++ build-essential libboost-all-dev libssl-dev git tmux iptablesClone the DigiByte Seeder software into your home folder:
cd ~/git clone https://github.com/DigiByte-Core/digibyte-seederSwitch to root:
suPerform a system update:
apt-get updateInstall the required software packages needed to compile and run the DigiByte Seeder:
apt-get install gcc g++ build-essential libboost-all-dev libssl-dev git tmux iptablesSwitch back to your user account (substitute '<user>' for your username):
su <user>Clone the DigiByte Seeder software into your home folder:
cd ~/git clone https://github.com/DigiByte-Core/digibyte-seederStep 4. Edit main.cpp [ONLY if you are running a DigiByte full node on the same machine]
If you are also running a DigiByte full node on the same machine as your DigiByte Seeder, you can edit main.cpp to add the loopback IP address, so that your seeder can connect directly to your node.
If you are only running a DigiByte Seeder, skip this step and continue to Step 5.
To edit main.cpp, you can use your preferred Linux text editor (vi or nano). In this example will use nano:
nano ~/digibyte-seeder/main.cppScroll down to line 424 and 425 and add the loop back IP address to the existing seeder addresses. (You can press Ctrl + _ to search for line 424.) Add the following to the mainnet and testnet lines:
"127.0.0.1", 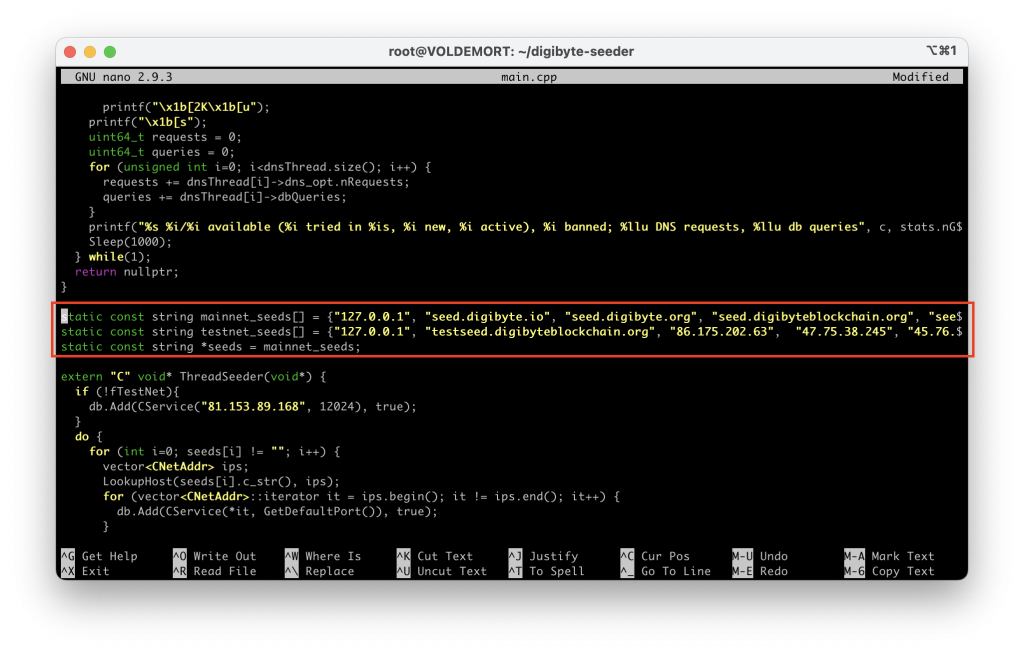
Press Ctrl-X to Exit nano, press 'Y' to save the modified file, and then press enter to confirm.
Step 5. Compile the DigiByte Seeder software
Enter the following commands to compile the software:
cd ~/digibyte-seedermakeThe DigiByte Seeder software will be compiled. It shouldn't take more than a minute. Make sure there are no errors.
Step 6. Launch your DigiByte Seeder
To make it easy to return to your seeder to check on it in future, we will run it inside a screen multiplexer called tmux. To create a new tmux session, enter:
tmux new -s dgbseederMake sure you are in the ~/digibyte-seeder directory:
cd ~/digibyte-seederTo see the flags you can use when running the DNS Seeder, enter:
./dnsseed --helpThis will display the help screen:
Usage: ./dnsseed -h <host> -n <ns> [-m <mbox>] [-t <threads>] [-p <port>]
Options:
-h <host> Hostname of the DNS seed
-n <ns> Hostname of the nameserver
-m <mbox> E-Mail address reported in SOA records
-t <threads> Number of crawlers to run in parallel (default 96)
-d <threads> Number of DNS server threads (default 4)
-a <address> Address to listen on (default ::)
-p <port> UDP port to listen on (default 53)
-o <ip:port> Tor proxy IP/Port
-i <ip:port> IPV4 SOCKS5 proxy IP/Port
-k <ip:port> IPV6 SOCKS5 proxy IP/Port
-w f1,f2,... Allow these flag combinations as filters
--testnet Use testnet
--wipeban Wipe list of banned nodes
--wipeignore Wipe list of ignored nodes
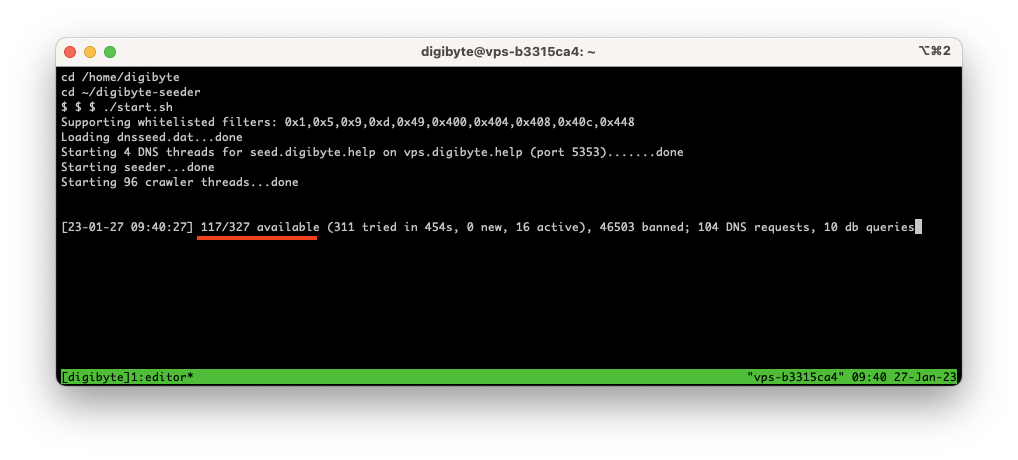
-?, --help Show this textTo launch your seeder on mainnet, enter:
./dnsseed -h seed.digibyte.help -n vps.digibyte.help -m email.digibyte.help -p 5353 -a 123.123.123.123- Subsitute seed.digibyte.help with the NS Host record you created in Step 1.
- Subsitute vps.digibyte.help with the A Host record you created in Step 1.
- Subsitute email.digibyte.help with an email address that you can be reached at for the SOA record, substituting the @ for a period. So [email protected] would be youremail.domain.com.
- Subsitute 123.123.123.123 with IP address of your VPS from Step 1.
IMPORTANT: if you want to run a testnet seeder, you also need to include the --testnet flag:
./dnsseed -h seed.digibyte.help -n vps.digibyte.help -m email.digibyte.help -p 5353 -a 123.123.123.123 —-testnetOnce running, your the software should start to crawl the DigiByte network looking for full nodes. Keep an eye on the number of available nodes it reports - this number should start climbing. It may take several minutes. If the number is above zero, your DigiByte Seeder should be working okay.
Tip: If you need to stop the DigiByte Seeder, you can press Ctrl-C.
Once you are happy that the Seeder is running correctly, you can disconnect from the tmux session, by pressing Ctrl-B followed by the letter D to disconnect.
Monitoring your DigiByte Seeder
In the future, when you need to check on the DNS Seeder, you can reconnect to the tmux session by name using:
tmux a -t dgbseederIf you only have one tmux session running on the machine, you can simple reattach to the previous session using:
tmux aTo view all the existing tmux sessions, enter:
tmux lsAs before, you can disconnect from the tmux session by pressing Ctrl-B followed by the D key.
Step 7. Map port 53 when running as Non-Root
Typically, you'll need root privileges to listen to port 53 (name service). One solution is using an iptables rule (Linux only) to redirect it to a non-privileged port:
- Ubuntu
- Debian
Configure DigiByte Seeder to run in userspace using -p 5353:
sudo iptables -t nat -A PREROUTING -p udp --dport 53 -j REDIRECT --to-port 5353Make the changes stick after a reboot:
sudo apt-get install iptables-persistent -YSwitch to root:
suConfigure DigiByte Seeder to run in userspace using "-p 5353".:
/sbin/iptables -t nat -A PREROUTING -p udp --dport 53 -j REDIRECT --to-port 5353Make the changes stick after a reboot:
apt install iptables-persistent -YSwitch back to your user account (substitute '<user>' for your username):
su <user>Another solution is allowing a binary to bind to ports < 1024 with setcap (IPv6 access-safe):
setcap 'cap_net_bind_service=+ep' /path/to/dnsseedStep 8. Test that your DigiByte Seeder is reachable from the Internet
To verify that your DigiByte Seeder is setup correctly, open a web browser and visit:
https://www.whatsmydns.net/#A/seed.yourdomain.comSubstitute seed.yourdomain.com with the URL of your seeder.
Each result should produce a list of IP address like below. You may get a few bad results but as long as the majority are returning a list of IP addresses your seeder should be fine.
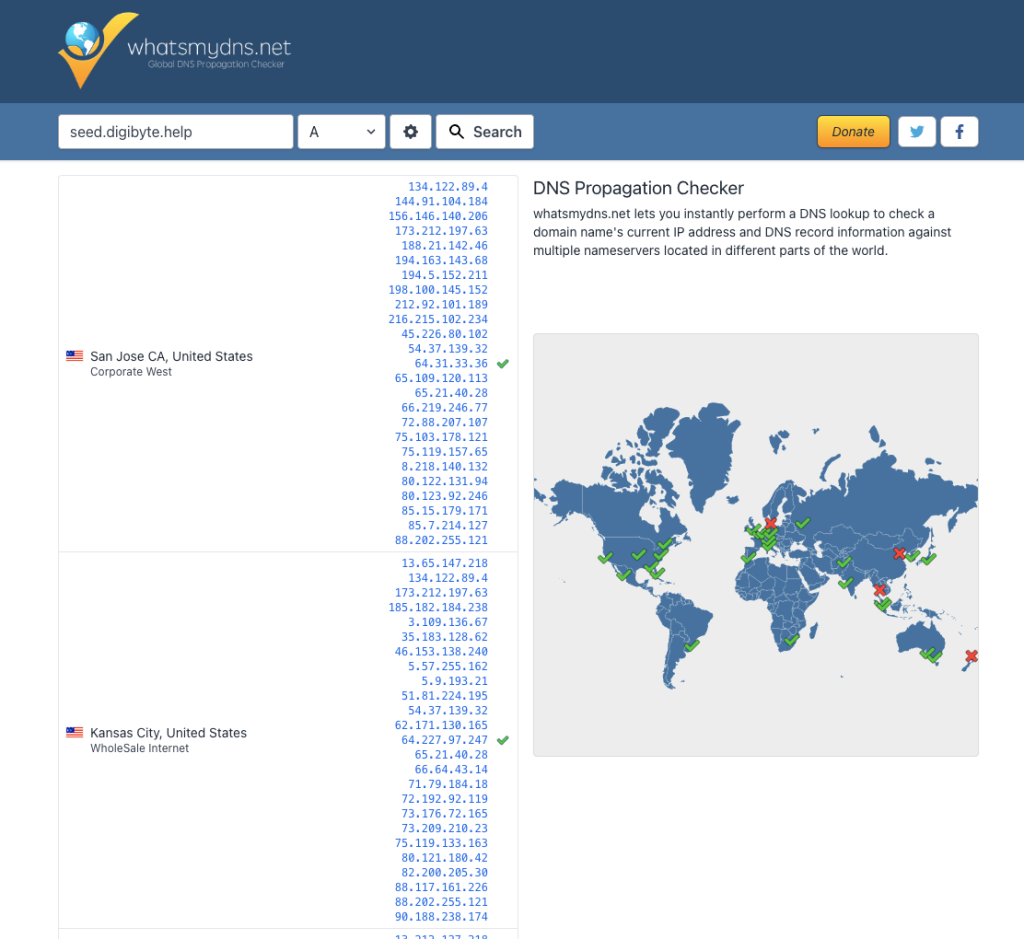
If your DigiByte seeder appears to be successfully crawling the network, but you are only receiving a single IP address for each location, or receiving a red X on all the results, then please try the troubleshooting steps below.
Troubleshooting
Running under Ubuntu
All Ubuntu releases from 16.10 onwards come installed with systemd-resolved, which prevents the seeder from running effectively.
The recommended solution is to bind the seeder to a specific IP address:
./dnsseed -h seed.example.com -n vps.example.com -a 123.123.123.123Firewall
If you are not seeing a list of IP addresses, try opening the firewall ports, if enabled.
Check the current firewall status:
sudo ufw status verboseOpen the DNS port:
sudo ufw allow 53or
sudo ufw allow 5353If you are also running a mainnet node on the VPS, open the P2P port 12024:
sudo ufw allow 12024If you are also running a testnet node on the VPS, open the P2P port 12026:
sudo ufw allow 12026Step 9. Setup DigiByte Seeder to start automatically at boot
You can use the included startseeder.sh script to automatically startup your DigiByte Seeder when your system boots.
Edit the script to add your DigiByte Seeder credentials:
nano ~/digibyte-seeder/startseeder.shSave and exit. Copy the file to your home folder:
cp ~/digibyte-seeder/startseeder.sh ~/Make it executable:
sudo chmod +x ~/startseeder.shEdit cron:
crontab -eAdd this value to the bottom of your cron file. Replace '<user>' with your user account name.
@reboot sleep 30 && /home/<user>/startseeder.shWhen your server boots, it will pause for 30 seconds, before launching your DigiByte Seeder. Adjust the duration if needed. Save and exit.
Step 10. Make a Pull Request to add your new Seeder address to the DigiByte codebase
Please make a Pull Request to the Github repos to add your Seeder URL in the following locations:
- Mainnet Seeder List in DigiByte Core develop branch
- Testnet Seeder List in DigiByte Core develop branch
- DigiByte DNS Seeder software
If you are not comfortable doing this, please get in touch in the #DGBCIT channel on the DigiByte Discord server, so that someone can help you.
Alongside your seed server address, please include your name and Github handle, so there is a means of contacting you in an emergency.